Elevate the famous Twix chocolate bars by making your own with delicious creamy caramel and quality milk chocolate. These mouth-watering Twix bites are a huge crowd-pleaser and way better than the store-bought Twix bars.
I have dived head first into this year’s first batch of holiday treats and today it’s all about homemade Twix bars! Twix is my all time favorite chocolate bar. I love the combination of crunchy biscuit, soft caramel, and sweet milk chocolate. And the fact that there are two in a pack? Absolute genius! Perfect for sharing (or two for me!).
Twix is really a classic chocolate bar that never disappoints. However, let’s be honest. Twix bars are made with milk chocolate that is mediocre at best (is it even real chocolate?) and the biscuit is actually kind of dry if you think about it. So I decided to make my own Twix to see if a homemade version would trump my favorite chocolate bar.
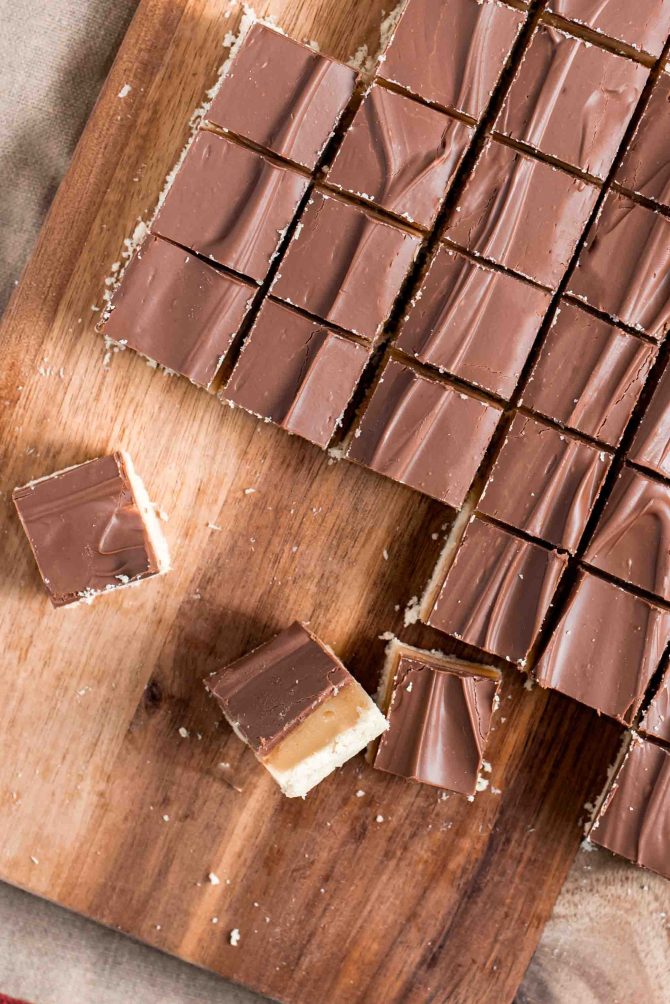
My homemade Twix bars recipe features a crispy, butter-baked biscuit base, topped with a layer of creamy soft caramel. Finally, it’s coated with a layer of quality milk chocolate (I prefer Callebaut 823 milk chocolate). You’ll find the recipe below and I promise–you won’t regret spending time on these!
What are Twix chocolate bars?
Twix is a world-famous chocolate bar, and it’s easy to understand why! It consists of a crunchy biscuit covered with a layer of caramel and encased in a layer of milk chocolate. There are two bars in a pack, making it the perfect chocolate to share.
Ingredients for Homemade Twix Chocolate Bars
Making homemade Twix chocolate bars requires making three different elements, but doesn’t rquire a lot of ingredients. However, if you’re not a regular baker, you may not have all the ingredients in your pantry. Here’s what you’ll need:
Flour: Plain all-purpose flour works great for the Twix base.
Turbinado or light brown sugar: You can use regular white sugar, but turbinado sugar gives a wonderful depth of flavor and a creamier texture to the caramel, so I definitely recommend getting a bag of it. If you can’t get it, use light brown sugar.
Cornstarch: This makes the Twix base nice and soft so you won’t break a tooth on it.
Butter: You’ll need salted butter for the Twix bars, for both flavor and texture!
Egg yolk: This gives structure to the Twix base. Save the egg white for an omelet.
Sweetened condensed milk: This type of milk is cooked down to a thicker consistency. It helps create a smooth and delicious caramel that’s perfect for Twix. It can be found canned in most supermarkets.
Glucose syrup: This helps prevent the caramel from crystallizing.
Vanilla: Adds a lovely flavor to your Twix bars!
Milk chocolate: Of course, the finishing touch for your Twix is the chocolate. Go for quality milk chocolate for the best results. I recommend Callebaut 823 milk chocolate.
How to Make Homemade Twix Bars
Making homemade Twix is actually pretty simple as long as you understand the basics of cooking a caramel. There are three different elements to prepare, and they require some cooling time, so be prepared for a bit of waiting time.
Homemade Twix chocolate bars have three layers:
Cookie base
Start by making the cookie base. Mix the ingredients for the dough until you get a soft shortcrust pastry. Press it into a baking pan lined with parchment paper and bake it until golden. Let it cool off in the pan.
Soft caramel
My Twix caramel is made with sweetened condensed milk because it helps create a smooth, creamy caramel. You could make a classic caramel if you prefer, but I recommend using my condensed milk version because it’s easy and gives the perfect soft consistency that’s firm enough to hold its shape in the Twix bars but stays soft. It’s harder to get the right balance with a classic caramel. You can cook the caramel while the base is cooling. Let it cook for 5-8 minutes until it’s golden and reaches 100°C (212 °F). Pour the caramel over the Twix base and spread it into an even layer with a spatula. Let it chill before moving on to the next layer.
Milk chocolate
Finally, you need to spread a layer of milk chocolate on top of the caramel. If you want a nice and crisp chocolate layer, you should temper the chocolate. Spread the chocolate over the caramel and smooth it out with a spatula or scraper. Let the chocolate set in a cool place, ideally 16-18°C (60-64°F), not in the fridge, as it’s too cold for chocolate. Once set, cut your Twix into bite-sized pieces or bars.
Recipe
Homemade Twix Chocolate Caramel Bars
No ratings yet
These delicious homemade Twix bars are the luxury version of the world famous chocoalte bar. Made with buttery biscuit base, creamy caramel and quality milk chocolate, this takes Twix bars to a whole new level!
In a bowl, mix flour, Turbinado sugar, and cornstarch. Use your fingers to crumble the butter into the flour mixture until it resembles crumbs.
150 g flour, 65 g Turbinado sugar, 10 g cornstarch, 100 g butter
Add water and egg yolk to the mixture, and knead until a smooth dough forms.
1 tbsp cold water, 1 egg yolk
Line a 21x21 cm (8x8 inch) pan with parchment paper so the biscuit base can easily be lifted out after baking. Press the dough evenly into the pan using your fingers.
Bake the base at 180 °C (356 °F) for about 20 minutes, or until lightly golden. Lift the base out using the parchment paper and let it cool completely on a wire rack.
Twix caramel:
While the biscuit base cools, prepare the caramel. In a small pot, combine sweetened condensed milk, Turbinado sugar, butter, glucose syrup, and vanilla.
397 g sweetened condensed milk*, 130 g Turbinado sugar, 85 g butter, 1 ½ tbsp glucose syrup, ¾ tsp vanilla
Heat the mixture over medium heat, stirring occasionally, until the sugar and butter have melted.
Increase the heat and bring the mixture to a boil, stirring constantly for 5-8 minutes (or until the caramel reaches a temperature of just over 100 °C (212 °F) (you can use a candy thermometer). The caramel should be a light golden color.
Place the cooled Twix biscuit base back into the pan with the parchment paper. Pour the caramel over the base, spreading it evenly with a spatula. Chill the Twix in the fridge for 15 minutes.
Twix milk chocolate:
Melt 110 g quality milk chocolatein the microwave, stirring intermittently. It should reach a temperature of 45 °C (113 °F)-50 °C (122 °F) on a candy thermometer.
110 g quality milk chocolate
Add the remaining 40 g quality milk chocolate and stir until it cools to 28 °C (82 °F)- 29 °C (84 °F). Take the Twix out of the fridge and pour the tempered milk chocolate over it. Smooth it out with a spatula or palette knife.
40 g quality milk chocolate
Refrigerate the Twix for about 1 hour. Then, cut into small Twix square bites or bars using a sharp knife.
RATE THE RECIPE
Tag @bageglad på Instagram så jeg kan se og dele det du har lavet!
Hi, I’m Trine – home baker from Copenhagen, Denmark. “Bageglad” means happy to bake in Danish and I have been spreading this happiness on the blog since 2012. Today, it reaches more home bakers worldwide than I could ever have dreamed of! Thank you for visiting!
Hi, I’m Trine – home baker from Copenhagen, Denmark. “Bageglad” means happy to bake in Danish and I have been spreading this happiness on the blog since 2012. Today, it reaches more home bakers worldwide than I could ever have dreamed of! Thank you for visiting!


 Time: 2 hours
  Difficulty: Moderate
 Yield: 30 pieces


