These quick and easy Christmas Tree Brownies bring festive holiday vibes and taste amazing. They’re a fun holiday dessert that can be ready in just 1 hour and are perfect for any holiday event, office gathering, or a school or sports event!
Christmas is just around the corner, and luckily, we’ve got snow! I’m so excited for the holiday gatherings with family, friends, and coworkers. If you want to bring something delicious to one of these festive get-togethers, these fun and festive Christmas tree brownies are a quick and easy way to add some holiday cheer.
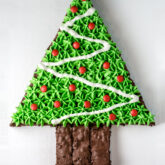
These Christmas tree brownies start with a simple brownie base, cut into a Christmas tree shape. Then they’re decorated with “spruce” frosting and topped with your choice of edible holiday decorations. It’s a super easy cake that’s perfect for serving a crowd at any Christmas event, and it doesn’t require much time or skill.
A Good Cake to Bake with Kids
Brownies are so simple to make, making them the perfect recipe to whip up with kids helping out in the kitchen. It’s especially fun to decorate the Christmas tree brownies together! Get creative and let everyone in the family have a go at adding their own holiday touch.
My recipe for the world’s best brownies is the most popular recipe on my blog, and for good reason. They’re incredibly delicious and practically foolproof, even for beginners. So, of course, I recommend using that recipe as the base for your Christmas tree brownies, although if you’re in a hurry you could opt for box brownies (but please don’t!).
One great thing about my brownie recipe is that you can easily scale it up, even by three times! That’s exactly what I did for the Christmas tree brownies you see in the photos, as I needed enough for a large holiday gathering of both kids and adults. I baked them in an adjustable 30×40 cm (12×16 inches) baking pan.
How to Cut a Brownie Christmas Tree
Cutting your brownie into a Christmas tree shape is super easy. Here are my top tips:
Wait until the brownie has completely cooled. If it’s still warm, it will stick to the knife and you’ll get uneven edges.
If you’re not great at eyeballing, draw a template on parchment paper, cut it out, and lay it on the brownie to use as a guide.
Use a sharp kitchen knife.
Bonus Tip
If you’re serving these at a standing event or want to ensure everyone gets equal-sized pieces, cut the brownies into pieces before decorating. This way, you avoid cutting through the decorations later, and people can easily grab a piece without ruining the design.
After frosting, I added a royal icing garland (powdered sugar mixed with a bit of egg white) and red M&Ms for ornaments. Of course, you can decorate your tree however you like! Here are a few ideas:
Chocolate buttercream decorated with gold and silver sprinkles, brown M&Ms, and Maltesers crunchy chocolates.
Dark green buttercream with a garland of gold sprinkles, red M&Ms, and gold star sprinkles.
Green buttercream topped with gummy candies like hearts and gummy bears for a playful touch.
Recipe
Easy Christmas Tree Brownies
No ratings yet
This festive Brownie Christmas Tree Cake is as fun to make as it is to eat! A fudgy brownie makes up the Christmas Tree and is decorated with a delicious vanilla buttercream.
Prepare a triple batch of my brownie recipe and bake it in a pan about 30 x 40 cm (12 x 16 inches) in size. If you don’t have a pan that large, an adjustable baking pan works well.
3 batches of my brownie recipe
Let the brownie cool completely. Cut it into the shape of a Christmas tree.
Optional: Slice the brownie into smaller pieces to make it easier to pull out a piece when serving.
Green buttercream:
Place the softened butter and vanilla in a bowl (a stand mixer bowl works well). Beat with a hand mixer or stand mixer until the butter is light and fluffy.
80 g butter, 1 tsp vanilla
Gradually add powdered sugar and milk, alternating between the two, and mix until the frosting is thick enough to hold its shape but still soft enough to pipe. Add green food coloring.
400 g powdered sugar, 5-6 tbsp milk, Green gel food coloring
Test the frosting by filling a piping bag with a star tip and piping a few stars. If the frosting is too thick, return it to the bowl and add a bit more milk. If it’s too thin, add more powdered sugar.
Start at the base of the brownie tree (not the “trunk”) and pipe rows of stars, moving upward in straight lines until you reach the top.
White buttercream:
In a bowl, mix the powdered sugar with a little pasteurized egg white using a spoon until it forms a runny icing.
50 g powdered sugar, Pasteurized egg white
Fill a piping bag fitted with a round tip (or snip a small hole in the bag) and pipe a garland design onto the brownie Christmas tree.
To decorate:
Decorate your Christmas tree with red M&Ms to resemble ornaments.
Red M&Ms
Store the brownie Christmas tree in the fridge until 1 hour before serving.
RATE THE RECIPE
Tag @bageglad på Instagram så jeg kan se og dele det du har lavet!
Hi, I’m Trine – home baker from Copenhagen, Denmark. “Bageglad” means happy to bake in Danish and I have been spreading this happiness on the blog since 2012. Today, it reaches more home bakers worldwide than I could ever have dreamed of! Thank you for visiting!
Hi, I’m Trine – home baker from Copenhagen, Denmark. “Bageglad” means happy to bake in Danish and I have been spreading this happiness on the blog since 2012. Today, it reaches more home bakers worldwide than I could ever have dreamed of! Thank you for visiting!


 Time: 1 hour
  Difficulty: Beginner
 Yield: 18 servings


